
Want a floating headboard without the sleepless nights thinking it might fall? A French cleat can make that happen. It’s a great way to hang a headboard without legs, provides stability, and eliminates any rocking or tipping movement. It can also support headboards that are bulky and heavy, and its structure gives you flexibility to adjust your headboard placement. Best part, it really isn’t that hard to make.
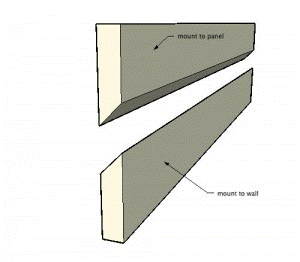
What is a French Cleat? A French cleat is a hanging method that uses two beveled pieces of wood. One piece is mounted to the wall facing up, while the other piece gets attached upside down to the object being hung, both pieces have 45-degree angles that interlock forming a strong secure bracket. Here’s how to make one.
Supplies
- 1/2 in. x 6 in. CVG Hemlock wood board
- Pencil
- Tape measurer
- Table saw
- FastenMaster MVP 1 1/2 in. wood screws
- Clamps
- Stud finder
- Level
- Drill
- Shims
How To
- Measure, mark and cut the Hemlock board six inches shorter than the width of your flat headboard piece with table saw.
- Set the table saw blade at a 45-degree angle and then measure, mark, and rip the board down the middle.
PRO TIP: Best to rip one piece down the middle at a 45 degree, creating two pieces. This makes a snug interlocking system when mounting the boards together again. - Level and clamp the top piece of wood to the top backside of your headboard with the angle toward the wall and pointing down.
- Pre-drill holes straight through the wood piece into the headboard. This prevents it from splitting.
- Fasten the wood piece to the headboard with wood screws. Remove clamps.
- With leftover wood, cut two squares approximately 3 in. – 4 in. and screw each one to the backside, inside bottom corners of your headboard. Remember to predrill first. This step is important to guarantee that your headboard will lay flat to the wall.
- Measure and mark your desired distance from the floor where you want your headboard to be on the wall. Standard is to have the bottom of the headboard to meet the top of the mattress.
- With a stud finder, locate the studs on the wall. Typically, studs are repeatedly spaced 16-24 inches apart so once you find a stud the next one should be within that range.
- Using a level and screws, attach the bottom piece of the wood to the wall with the angle facing away from the wall and pointing up. Remember to predrill first.
- If the wall is wavy, add shims between the board and the wall, constantly using the level to make sure the board is plumb.
- To hang the headboard, simply raise the top piece connected to the backside of your headboard, and gently lower it over the bottom piece that’s secured to the wall. This interlocks both pieces together, holding it in place.
To scoop up all the materials to make your own French cleat headboard, make a quick trip to your closest PARR Lumber yard location. And for fun, tune into PARR Warriors, Redo With Q: Episode 13, How to Install a French Cleat with special guest, Eli Green; Architect and owner of SQFT Studios. Watch cohosts, Tony Cookston and Corey Valdez, along with Eli, show Shannon Quimby of Hoffs Homestead how to make a French cleat for an old door she want to salvage into a one-of-a-kind headboard.
Shannon Quimby is an internationally acknowledged salvage designer.
